Thursday, September 8, 2016

Labyrenth CTF 2016 Documents track challenge 1

This post was written to document some of my things I learned from analysing the word documents from the Labyrenth CTF 2016. Please leave me comments or questions if you have any. :)

This post has two sections, the first section focused on an interest observation on the challenge document. The second focused on solving the challenge.

Anti Forensic Trick
While solving the challenge, I noticed the document could only be executed once. After a single execution, the document failed to work. I also noticed the file size reduced after a single execution.

I went on to investigate why. I noticed the following lines of code.


The above macro is executed when the document is open. However, it only proceed to execute the function "BkAIuNwQNDkohBY" only if the variable "ppKzr" is NOT "toto". "BkAIuNwQNDkohBY" contained the key functions of the code. If "BkAIuNwQNDkohBY" is executed, the variable "ppKzr" is overwritten with "toto".

I compared the hexdump of the documents before and after execution.


The long string stored in "ppKzr" was overwritten with "toto" which resulted in the document reducing in size.

With the long string overwritten the document could not be executed. Not only that we would not be able to de-obfuscate the strings in VB code. The long string is used as a dictionary in the de-obfuscation function "QklkhFEQNB". This 'trick' could be used by malware writer to prevent analysis from being done on the document after it is executed.

Solving the challenge
First, I choose to dump the macro using various tools. This blog post by Lenny Zeltster contained a number of the tools. The following diagram showed how I used olevba.


After reading the code I realised many of the strings are obfuscated. Then I made use of the debugging function in Visual Basic for Applications (VBA) in Word 2010. The short cut to activate it is Alt+F11.

From the code, the function "QklkhFEQNB" was called many times to de-obfuscate strings. Without going into the details of how the function worked. I used added "MsgBox" to dump out the strings after de-obfuscation was done.
After executing the document, the MsgBox would dump the de-obfuscated strings.
From this URL, we can notice its going to "10.1.33.7". The long string seems to be base64 encoded. Given a clue "b64" from the URL. After decoding the string, it seems like a long string of hex values. Using the next clue "x58". XOR was performed on the string and it decoded into the flag.

Monday, August 15, 2016

Labyrenth CTF 2016 Windows track challenge 1

For this CTF, I had a goal other than completing as many of the Windows challenges as possible. I wanted to explore different ways to solve the challenges other than using usual dynamic analysis with debuggers and state analysis with disassemblers.

Do feel free to leave comments and questions, I would try my best to address them. Do point out any errors you noticed. Thanks!

For Labyrenth CTF 2016 Windows track challenge 1, I used a binary analysis tool called Angr. Yes its spelled A-n-g-r, anger without the 'e'. I will walk through how I solved the challenge and focused on how Angr was used. The key takeaway for this challenge for me was on learning how to use Angr. For readers who just want to know how I used Angr, just skip to step six.

The first step was to find out as much as possible about the challenge binary provided. I used the Detect It Easy (DIE) tool and noticed the binary was packed using UPX.
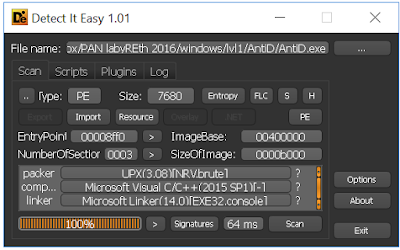


The second step was to unpack the binary and locate the Original Entry Point (OEP) of the unpacked codes. The OEP in the PE header of the binary belonged to the packing codes. Using the Ollydbg debugger I located the 'ar jmp; at the end of the packing code. After executing the far jmp instruction the EIP would point to the OEP of the unpacked code.

Before debugging the binary in a debugger, a little trick I learnt was to remove the ASLR flag in the binary. This allowed the binary to be loaded in the same base address during every execution. This eases the references made to static analysis tool such as IDA Pro. Do note some malware may not execute if they detected modifications to PE header.

I used CFF explorer to modify the "DLL can move" or ASLR flag under Optional Headers-> Dll Characteristics. Remove the tick next to "DLL can move" to disable ASLR for this binary.


After removing the ASLR flag I debugged the binary in Ollydbg debugger and located the "Far Jmp" instruction.


The reason I know to look for this far jmp was due to DIE detecting the use of the UPX packer. This packer  typically consisted of a far jmp instruction at the end of the packing code. Do note this may not always be the case. Malware writer can write codes to fool tools like DIE. I placed a breakpoint at the far jmp instruction and let the packer code unpack the packed codes. I would step one instruction after the far jmp instruction to locate the OEP of the unpacked code.

In the third step, after locating the OEP of the unpacked code, now I would dump the unpacked code for static analysis. I used the Scylla tool for this step. I would need to set the OEP as starting address of the unpacked code. Then locate the Import Address Table (IAT) of the unpacked code. Due to packing, the IAT was 'destroyed'. Using the "IAT Autosearch" function, Scylla could locate the IAT and rebuild it for ease of analysis in IDA Pro. Next was to Dump the unpacked binary and then Fix the dump with the IAT found by Scylla.


The fourth step involved static analysis using IDA Pro. Now using IDA Pro we could understand the code flow of the unpacked code. To quickly zoom into interesting functions to analysis in malware analysis is very important. We do want want to analysis the code from the start to the end. We could using strings in IDA Pro to locate strings that could point to interesting functions. Error messages in binaries 'might' provide clues to these strings. We executed the binary and it displayed the following messages.


We also located the same messages in the strings of the binary. These strings were original obfuscated due to the packer.


Using the strings of error message we discovered interesting functions to analyse.

All the strings pointed to a single interesting function!


From the call graph, I observed user input that was stored into a 0x100 bytes local variable being passed as argument into the Sub_109110B function. The Sub_109110B function would likely be the validation function to decide if the user input is correct. This is where we would focus our effort on for the next steps.

The fifth step would focus on the analysis of Sub_109110B function. The call graph showed the beginning of the function when it load local variables with lots of data. This a common trick by malware writer to use local variable to hide data from tools such as strings.
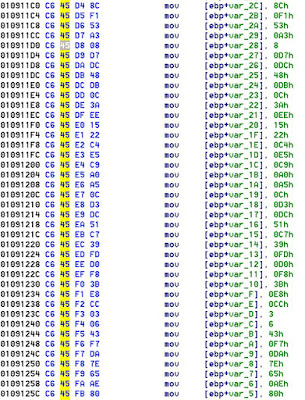

Next we try to understand what the function was trying to do. We notice a check of the length of user input using Strlen function against 0x10. Next was a loop that would be executed 40 times. Inside the loop was 4 functions that was called. The return value of all 4 functions were used to determine the code flow. If the return value of any of the 4 functions was not zero, the loop would exit before executing 40 times.
Diving into the 4 functions, I discovered the anti debugging checks.
1. CheckRemoteDebuggerPresent function
2. Find "Olldbg" window
3. IsDebuggerPresent function
4. RDTSC instruction
An easy way to defeat the debugging checks was to patch the return value of the 4 functions containing the checks. The patch to AL register value to zero during run time using debugger would allow the loop to be fully executed (40 times).

A check after the Strlen function seems to indicate the user input string had to be at most 16 bytes long. However, the loop executed 40 times. The return value of the Strlen had to be patched to allow the loop to finish execution.

From the code flow, I observe each character of the user input was manipulated before being validated. It seemed the user input was encrypted using a stream cipher before comparing with the encrypted data store in the local variables.

The sixth step was to figure out the correct user input to display the message "Well done! A+! You get a gold star!" I considered several options:
1. Brute force the user input using Winappdbg to inject user input string and patch anti debug checks
2. Brute force the user input against an implementation of the validation function Sub_109110B using python
3. Brute force the user input against a revered implementation of the validation function using python.
4. Using Angr !

I am not an expert on using Angr, I had help from my friend Ronald who spent a lot of time on reading the code in Angr and he even fixed some of its bugs.

A few key considerations before using Angr.
1. Angr's Windows loader could be buggy.
2. Angr made us of the VEX simulation engine which had limited abilities in simulating Windows APIs.
3. Need to determine the state of memory before the start point of analysis
3. Need to determine the start point of the analysis
4. Need to determine the constrains to the user input
5.Need to determine the patches to the anti debug checks
6. Need to determine the address of paths to avoid
6. Need to determine the target address of the analysis

1. Angr's Windows loader could be buggy.
Angr might not work for all windows binaries I guess this comes with practice and experience to determine which binaries works. For this challange, Angr worked and now I am doing this write-up.

2. Angr made us of the VEX simulation engine which had limited abilities in simulating Windows APIs.
Angr works best in analyzing codes without Windows APIs. I inserted hooks to 'remove' Windows APIs and patched the return value.

Patch the Strlen function to always return 16 to pass the check:

Patch the security cookie check function:


3. Need to determine the state of memory before the start point of analysis
3. Need to determine the start point of the analysis

The start point of the analysis would be the address when the user input string would be passed into the Sub_109110B function. The user input would be setup as an symbol value of 40 bytes (loop 40 times) ending with a null byte. The pointer to the user input would have to be pre-loaded into register ecx due to instruction "Push ECX" which load the pointer to user input as argument to Sub_1099110B.

4. Need to determine the constrains to the user input

User input print was determined to be printable ASCII ending with a null byte which was set as an constrain.

5.Need to determine the patches to the anti debug checks

Hooks were placed to return zero for the 4 functions of anti debugging

6. Need to determine the address of paths to avoid
6. Need to determine the target address of the analysis

Finally, set the address of code when the validation is correct and address when validation is wrong.

After correcting the bugs in my python script, I used Angr to solve the correct user input for challenge 1.



Tuesday, October 27, 2015

Unbricking Onda V975w tablet

I got this bricked tablet from my friend @Sirpoot. The tablet was bricked because he tried to flash it from Windows 8.1 to Android. The tablet refused to boot up and no sign of life when you press the power button.

I Googled on how to unbrick the tablet. I found this URL. The guy used a used a EEPROM programmer to reflash the BIOS chip in the dead tablet. I was thinking I could either buy the same EEPROM programmer to reflash the BIOS chip or I could use something else. I Googled and I discovered this blog post. In this blog Antonio, used a Beagle Board Black to reflash the BIOS chip. The key idea is to have a device that speaks the SPI protocol. 

I thought why not use a Raspberry Pi. So I borrowed a Raspberry Pi from @Sirpoot. The following would be the steps required to unbrick Onda V975w tablet using Raspberry Pi.

Equipment required:
1. Raspberry Pi installed with flashrom
2. SOIC 8 Pin test clip (Either this or this)
3 Female - Female Jumper cables to connect Raspberry Pi to SOIC test clip

First step is to gain access to Raspberry Pi via ssh. You can refer to this excellent blog post on how to do so.


Second step is to open up the tablet and gain access to the flash chip. You would have to pry open the metal shielding after opening the back cover of the tablet. Once you do that you could see the Intel CPU and the flash chip next to it. 

Third step is to connect the SOIC test clip to the raspberry Pi. For this I referred to this blog post.

However, this blog post is about flashing a laptop. To flash the BIOS chip in the tablet we have to leave Pin 3 and Pin 7 unconnected. The blog post mentioned the need to build a 'bridge' connection for Pin 3,7 and 8. For our case we can leave Pin 3 and 7 unconnected.

Fourth step is to identify the flash chip using flashrom.


This is necessary to confirm the previous steps are done correctly.

Fifth step is to read out the contents in the flash chip. You may want to skip this step if you just want to unbrick the tablet and not keep the existing contents of the flash chip.


Sixth step is to upload the correct BIOS in the flash chip. For Onda V97w I used this v975w_v3_WinBios-0926.rar to unbrick the tablet successfully. Just replace the "X98_Air_II.bin" file with the firmware you downloaded.


Finally, after a few minutes you will see this.


You can power up the tablet and see if it is unbricked :)
I have left out details like how to install flashrom in Raspberry Pi and Flashrom cant detect the chip.
Just post a question if any I will try to help.

Do leave any comments or questions.

Saturday, April 12, 2014

Practical Reverse Engineering Chapter 1 Page 69 Exercise 4

1. Explain two methods to get the instruction pointer on x64. At least one of the methods must use RIP addressing.
lea rax,[rip]

call NextLine
NextLine:
    pop eax


2. Perform a virtual-to-physical address translation on x64. Were there any major differences compared to x86?

There are many differences when performing virtual-to-physical address translation between x64 and x86. E.g. x86 has 4 sub sections which x64 have 5.

This blogpost that showed the differences.

Do note that you need to have kernel debugging setup using Windbg. Let me via comments if you have trouble with this step. I have tried kernel debugging via Windows host and VMware and OS X host and VM fusion. There are slight differences in configuring the vmx file.


Feel free to leave me comments for the answers above. :)

Practical Reverse Engineering Chapter 1 Page 64 Exercise 3

All the samples used in the book can be downloaded here.

1. Repeat the walk-through by yourself. Draw the stack layout, including parameters and local variables.

An interesting instruction @07: sidt  fword ptr [ebp-8]     save 6-byte IDT register [ebp-8]


2. In the example walk-through, we did a nearly one-to-one translation of the assembly code to C. As an exercise, re-decompile this whole function so that it looks more natural. What can you say about the developer's skill level/experience? Explain your reasons. Can you do a better job?

The codes did not include any anti-debug or anti disassemble features. It only has one anti virtualisation feature. The developer does not have very high skill. I would include obstruction tricks to increase difficulty of disassembling the codes.

3. In some of the assembly listings, the function name has a @ prefix followed by a number. Explain when and why this decoration exists.

The function is making use of FastCall convention. At sign (@) is prefixed to names; an at sign followed by the number of bytes (in decimal) in the parameter list is suffixed to names.

4. Implement the following functions in x86 assembly: strlen, strchr, memcpy, memset, strcmp, strset.

Answer to this question is Work In Process

5. Decompile the following kernel routines in Windows:
KeInitializeDpc
KeInitializeApc
ObFastDereferenceObject (and explain its calling convention)
KeInitializeQueue
KxWaitForLockChainValid
KeReadyThread
KiInitializeTSS
RtlValidateUnicodeString

All of them make use of _stdcall calling convention where the callee clear the stack before exiting the routines.

6. Sample H. The function sub_13846 references several structures whose types are not entirely clear. Your task is to first recover the function prototype and then try to reconstruct the structure fields. After reading Chapter 3, return to this exercise to see if your understanding has changed. (Note: This sample is targeting Windows XP x86.)

Answer to this question is Work In Process

Note: The hash value for sample H in the book has error and the right sample H can be downloaded here. I loaded the sample H in IDA Pro 6 and the function names are -4 bytes from the ones mentioned in the book.


7. Sample H. The function sub_10BB6 has a loop searching for something. First recover the function prototype and then infer the types based on the context. Hint: You should probably have a copy of the PE specification nearby.

sub_10BB6 (int1,int2)

Note: The hash value for sample H in the book has error and the right sample H can be downloaded here. I loaded the sample H in IDA Pro 6 and the function names are -4 bytes from the ones mentioned in the book.

8. Sample H. Decompile sub_11732 and explain the most likely programming construct used in the original code.

Switch Cases.

Note: The hash value for sample H in the book has error and the right sample H can be downloaded here. I loaded the sample H in IDA Pro 6 and the function names are -4 bytes from the ones mentioned in the book.

9. Sample L. Explain what function sub_1000CEA0 does and then decompile it back to C.

Sub_1000CEA0 has 2 parameters ,an address of a string and a character.
Sub_1000CEA0 begin with search the location of the null character at the string with the first "scasb" instruction. Then I look 'backward' to locate a character with the second "scasb" instruction.


10. If the current privilege level is encoded in CS, which is modifiable by user-mode code, why can't user-mode code modify CS to change CPL?

The CS register cannot be modified using load instructions. Only instructions that affect the flow of the routine can change it. To increase CPL one can use the IRET instructions but to decrease the CPL one need to make use of call gates or SYSENTER instructions to enter Ring 0.


11. Read the Virtual Memory chapter in Intel Software Developer Manual, Volume 3 and AMD64 Architecture Programmer's Manual, Volume 2: System Programming. Perform a few virtual address to physical address translations yourself and verify the result with a kernel debugger. Explain how data execution prevention (DEP) works.

DEP is implemented using XD bit in the Extended Feature Enable Register of the Intel CPU.
Instructions cannot be fetch from PAE pages with XD bit set.

Do note Windows kernel debugging using Windbg is needed before embarking on this question.

12. Bruce's favorite x86/x64 disassembly library is BeaEngine by BeatriX (www.beaengine.org). Experiment with it by writing a program to disassemble a binary at its entry point.”

Answer to this question is Work In Process

Practical Reverse Engineering Page 33 Chapter 1 Exercises 2

1. Given what you learned about CALL and RET, explain how you would read the value of EIP? Why can't you just do MOV EAX, EIP?

call next
next: pop eax

EIP is a special register that can't be accessed directly for x86 CPU. For x64 RIP can be read directly.


2. Come up with at least two code sequences to set EIP to 0xAABBCCDD.

JMP   0xAABBCCDD

PUSH    0xAABBCCDD
RET


3. In the example function, addme, what would happen if the stack pointer were not properly restored before executing RET?

Nothing will happen as ESP is not changed during the function flow.
There is no instructions in the function that cause changes to the stack.

4. In all of the calling conventions explained, the return value is stored in a 32-bit register (EAX). What happens when the return value does not fit in a 32-bit register? Write a program to experiment and evaluate your answer. Does the mechanism change from compiler to compiler?”

“int
__cdecl addme(short a, short b)
{
    return a*b;
}”

Answer to this question is not complete yet.


Feel free to leave me comments for my answers. :)

Practical Reverse Engineering Page 22 Chapter 1 Exercise 1

1. This function uses a combination SCAS and STOS to do its work. First, explain what is the type of the [EBP+8] and [EBP+C] in line 1 and 8, respectively. Next, explain what this snippet does.
01: 8B 7D 08         mov   edi, [ebp+8]
02: 8B D7            mov   edx, edi
03: 33 C0            xor   eax, eax
04: 83 C9 FF         or    ecx, 0FFFFFFFFh
05: F2 AE            repne scasb
06: 83 C1 02         add   ecx, 2
07: F7 D9            neg   ecx
08: 8A 45 0C         mov   al, [ebp+0Ch]
09: 8B FA            mov   edi, edx
10: F3 AA            rep stosb
11: 8B C2            mov   eax, edx”

[EBP+8] is pointing to a string.
[ebp+0Ch] is pointing to a character.
The above pointers are likely to be arguments passed into the function.

Line 1-5 is check length of the string before it is NULL terminated. Count will be in ECX.
Line 6-7 Prepare the count in ECX for use in the 2nd part of the function.
Line 8-10 over write the string pointed by [ebp+8] with character pointed by [ebp+0Ch].
Line 11 the pointer to the overwritten string is returned by Eax.

Feel free to leave comments on my answers. :)